One of the questions that the PressForward team gets repeatedly is how publications can use custom fields to automatically print data about a post once it is published. Publications often wish to display a generic name, such as “The Editors,” on a post rather than the name of the user who published the post. On Digital Humanities Now we use custom fields to store the names of our Editors-at-Large for the week a piece is featured as well as the name of the Editor-in-Chief for that week.

Storing this data in custom fields means it is stored in the database and always associated with that post for archiving purposes. The post will always include the name of the Editor-in-Chief and the Editor-at-Large for that week even if the user were to delete their account. A second post will detail the process used on DHNow to display a generic name as the author on some posts while displaying the PressForward author on others.
In addition to a publication specific field, such as Editor-in-Chief, PressForward uses custom fields to store several pieces of data about each post, such as the original url, the author’s name, the number of nominations a post has received, and the date of the original post. WordPress, by default, doesn’t display any of these fields. However with a few simple changes to a site’s theme it is possible to display some or all of the information stored in the custom fields for your site’s readers.
Understanding Custom Fields
A custom field allows users to associate bits of information with a particular post. This information is known as meta-data. Custom Fields are handled in “key” and “value” pairs. The key field is the ‘name’ which identifies a particular field and it remains a constant. The value field is the information that gets stored and displayed when it is called in your theme. The content in the value field will change depending on the post. For example, the key value might be Academic Discipline and the value field, which may vary depending on the content of the post, might be “biology,” “chemistry,” or “astronomy.”
Setting Up Custom Fields
Creating and displaying custom fields in WordPress is a two step process. First, a custom field needs to be created in the “Edit Post” page. Second, a code snippet that queries for the value associated with custom field, if a value exists, and displays that value on the post needs to be added to your post template.
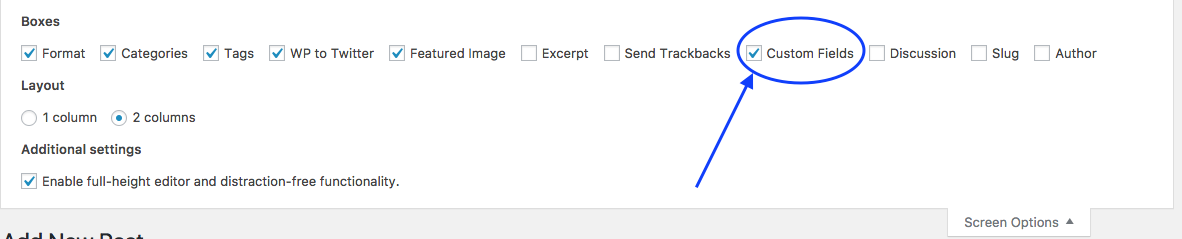
Custom fields are displayed in a panel below the text field in the edit page of a new or existing WordPress post. This panel is turned off by default. To ensure that custom fields are turned on select “Display Options” at the top of the screen and then select “Custom Fields” from the list of options.
Creating a Custom Field
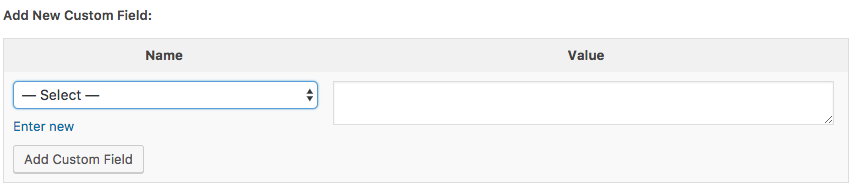
To create a new custom field scroll down in the “Edit Post” page and find the Custom Fields section. Under the “Add New Custom Field” heading select “Enter New” and a text field will appear above. Enter the “key” or the “name” of the custom field here. For this example, we’ll use “academic_discipline.” Hit the tab button or click over to the “Value” field and enter the value that you would like displayed. Once you’ve added both values click the “Add Custom Field Button.” This field has now been added to your database and will show up in the Custom Field dropdown menu on any post in your site. Each time you want to associate an academic discipline with a post simply use the “Add a New Custom Field” name drop down to select “academic_discipline” and enter a value.
Displaying a Custom Field in your Theme
The custom field we created is now associated with the post within the WordPress database but it won’t appear on the public end of the site unless we tell WordPress to display it in the post template. Luckily, WordPress provides several easy to use functions that facilitate printing custom field data out onto a post. Two strategies are detailed here. The first, discusses how to print out all metadata associated with a post. However, PressForward associates a number of fields with each post that users may not want displayed by default which makes the code to display a single or a few custom fields useful. The second strategy illustrates how to print out one custom field and wrap it in some html in the footer of a post. However, the first step for either strategy involves finding the proper location to add code in your theme.
“The Loop”
In order for WordPress to query and return the proper information about a post, any code that asks for meta data stored in a custom field must be placed within what WordPress calls “The Loop.” The loop is “PHP code used by WordPress to display posts. Using The Loop, WordPress processes each post to be displayed on the current page, and formats it according to how it matches specified criteria within The Loop tags.”1 Anything code or text that is included inside the loop will be processed on each post. So to display custom fields, the code must be placed inside the loop to ensure it shows up for each post on each post.
The Loop can typically be found in your WordPress Theme in the single.php file which determines the output and structure of a post. You can locate the single.php file by navigating to your theme’s directory on your server or in the WordPress theme editor. The path will be /wp-content/themes/name-of-active-theme.2 A typical structure for the Loop is something like this:
<?php if ( have_posts() ) { while ( have_posts() ) { the_post(); // // Post Content here // } // end while } // end if ?>
Printing All Metadata Associated with a Post
To print out all of the metadata stored in the Custom Fields for a post, WordPress provides a function called “the_meta().” This function will print out a list of all the keys and associated values in a bulleted list and should be included within the loop. For example, below is a typical loop that might be included in a theme. To print out the custom fields in the footer of the post, “the_meta()” needs to be added just after the content but before the comments.
<?php // Start the loop. while ( have_posts() ) : the_post(); /* * Include the post format-specific template for the content. If you want to * use this in a child theme, then include a file called called content-___.php * (where ___ is the post format) and that will be used instead. */ get_template_part( 'content', get_post_format() ); the_meta(); // If comments are open or we have at least one comment, load up the comment template. if ( comments_open() || get_comments_number() ) : comments_template(); endif; // Previous/next post navigation. the_post_navigation( array( 'next_text' => '<span class="meta-nav" aria-hidden="true">' . __( 'Next', 'twentyfifteen' ) . '</span> ' . '<span class="screen-reader-text">' . __( 'Next post:', 'twentyfifteen' ) . '</span> ' . '<span class="post-title">%title</span>', 'prev_text' => '<span class="meta-nav" aria-hidden="true">' . __( 'Previous', 'twentyfifteen' ) . '</span> ' . '<span class="screen-reader-text">' . __( 'Previous post:', 'twentyfifteen' ) . '</span> ' . '<span class="post-title">%title</span>', ) ); // End the loop. endwhile; ?>3
That resulting page, without styling the custom field output, would look something like this:
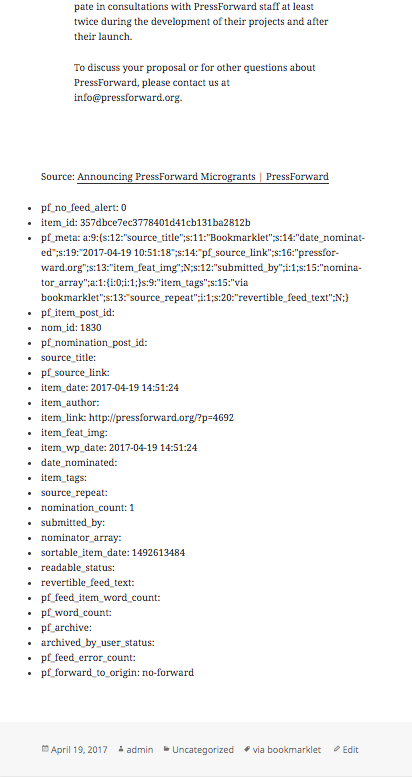
The function did what it is intended to do, print out a list of every key value pair saved in the custom fields even if that custom field’s value is empty. However, PressForward includes a lot of custom fields with every post which leads to a long output that is full of data. Users may not necessarily want to display every field publicly.
Printing Select Fields Associated with a Post
Rather than calling all custom fields it is often more useful to call the individual fields that should be displayed and wrap them in a conditional statement that prevents them from being displayed if the value has been left blank. This is useful if the field is meant to only be displayed on a featured post or on a post in an individual category. To do this, WordPress provides a template that takes the post id (acquired from the loop) and queries for a custom field by name. This template can be wrapped in a conditional statement so that it only prints information out if the custom field exists on the post. For example, adding the code below into the loop below the content but above the comments would print the information stored in a field titled “Editor-in-Chief.”
`$chief = get_post_meta($post->ID, "editor-in-chief", true);
		if (!empty($chief)) {
			echo "<p>The Editor-in-Chief this week is: " . $chief . ". </p>";
		}`
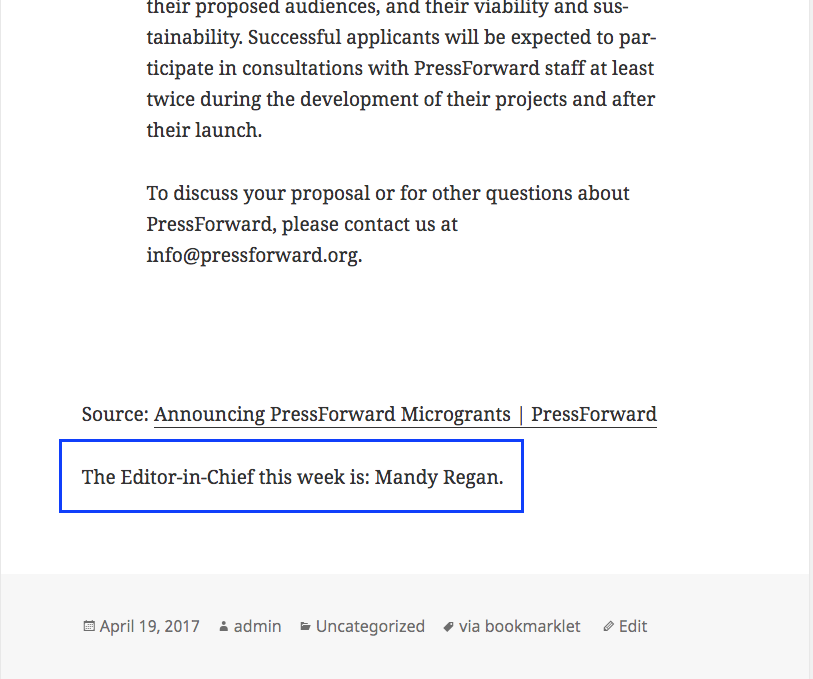
This snippet queries for a custom field with a key of ‘editor-in-chief’ and then stores the value in the variable $chief. The variable, which I’ve called $chief but can be called anything, stores the data temporarily. Next, a conditional statement, in this case an IF statement, is used to check that the variable we just created is not empty. If the variable isn’t empty – meaning the field did exist and did have a value – the snippet echoes (or prints) out some explanatory text as well the value stored in $chief. The third line echo "<p>The Editor-in-Chief this week is: " . $chief . ". </p>"; uses a PHP string operator, in this case the period or the concatenation operator (‘.’), to construct a line of html and insert the value of our variable $chief. The resulting html gets inserted into our post like this:
Custom Fields can be used to display information such as this on any post or page within WordPress. With a little knowledge of php they can become a powerful tool for managing data about a post (or page) in WordPress. In combination with PressForward, they allow publications automate the display of backend statistics about the original post and their community’s usage of PressForward.
Custom fields are powerful tools and questions about how to use them are among the most frequent questions we get. Oh Digital Humanities Now, the team long ago made the decision to obscure author information on news items since they were frequently job ads, announcements, or Calls for Proposals which typically don’t have a formal author.
-
“The Loop.” Wordpress Codex. https://codex.wordpress.org/The_Loop (retrieved April 19, 2017). ↩︎
-
Keep in mind that any changes made to the theme will be overwritten by a theme update so if you plan to use a theme that is updated frequently you may want to look into building a child theme. ↩︎
-
This example uses Wordpress’s Twenty Fifteen theme. ↩︎